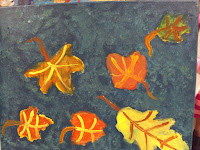
Back in the fall, I posted a project on my other blog, www.callingallsleepyhead.blogspot.com , called fall leaves using the Art Emboss Aluminum sheets for the first time. I tried using these again with my kiddos at home today to make some fun ornaments. They were really easy and turned out great. Click HERE to see the post on how I did them and how they turned out. These could be used to do a lesson on shapes, texture or color theory. Hope everyone has a wonderful Christmas!!! I'm going to take a break from posting for the holidays so I can enjoy some time with my family-I hope you get time to enjoy yours. I'll see you in January with a bunch of fun, new projects!
Monday, December 21, 2009
Monday, December 7, 2009
Mommy & Me Christmas Tree
Sorry I'm behind on posting, but I've been busy wrapping up my year in art class, plus trying to decorate for Christmas and shop for presents. We did these great Christmas trees in all my classes and even tried them in my Mommy and Me class with 4 year olds last week. The results are beautiful! They are super easy--you've got to try this at home. My four year old made one on paper (above) so now I've got to get busy having my older kids each make one on canvas. We used a 10 x 20 canvas panel and acrylics for my older classes, and large water color paper and tempera for the mommy and me class.
First I cut a large stencil from poster board.
I had the students paint the background with gold metallic paint and accent the edges with a copper metallic. The older class used a large paint brush, the M& M students used a foam brush.
After they painted the background, I had them paint the floor in brown.

I taped the stencil down on the table on top of their background. Using a very soft natural sea sponge they sponged on a layer of light green first and then a darker green.

Remove the stencil. You will have very crisp edges for the tree. I then instructed the students on how to soften the edges with the sponge to give the tree a more realistic look.


Then I instructed them on how to paint the tree skirt and tree trunk. In the m&m class we used a rectangle shaped sponge to stamp the trunk.
We stuck with white for the lights and red for the ornaments, but I let them choose their brush size on how big they wanted the decorations on their tree, and also if they wanted a pattern or just random decorations.
Then if they wanted, they could paint a star on top. For the m&m class we used a star shaped stamp. Lastly, we touched up the background (the stencil may remove some of the background paint if it's not all the way dry).
I wish the pictures were better so you could get the full effect of how beautiful the gold and copper paint looks in the background! They were stunning! I also talked about Impressionism with this lesson and introduced Claude Monet.

Saturday, November 28, 2009
Mixed Media Snowmen
We are supposed to be getting some cold weather this week so I thought I'd get everyone in the mood with a snowman project. Also, I made a new blog friend over at MaryMaking, and her cute snowman post reminded me of this project I did with my art class last winter. I wish I could find more of the pictures of all the cute snowmen the kids made-they were so fun and creative. I'm still trying to organize pictures, so maybe I'll run across them. These take 2-one hour class sessions and are painted on a canvas panel. After painting the canvas a sky blue color, I had the students make the snowmen and ground snow out of modeling paste-it gives great dimension. The modeling paste will have to dry so this is all done the first class, along with some of the embellishments. Next class, we painted the snowmen, added highlights and shadows, and glued on all the embellishments like real stick arms, fabric scarves, and real buttons. The carrot noses were made from model magic clay and painted (created the first class). Last, we added sparkle paint to the snow to give it a nice shimmer. In this lesson I teach about texture and mixed media art.
Sunday, November 22, 2009
Mixing Color with Kandinsky
I use this lesson with my older students (ages 3rd-6th) to practice color mixing and also to learn color theory. It's also great to introduce Wassily Kandinsky, patterns and rhythm. I use a square canvas and have them divide into nine square parts. We paint each square one of the following: (I only allow the students to use blue, red, yellow, black and white for mixing): primary colors, secondary colors, complementary colors, analogous colors, warm colors, cool colors, neutral colors, tint/shade of one color, and the last with colors of their choice. They have so much fun mixing and seeing the variations in color.
Tuesday, November 17, 2009
Goodbye Fall
Sunday, November 15, 2009
Scribble Art
Friday, November 13, 2009
Van Gogh Clay Plaques
Here's another great lesson that I got from Dick Blick Lesson Plans online. I've done this project with students(ages 2-6th grade) several times and I always get great results. It's a great lesson to introduce Vincent Van Gogh and landscapes, basic clay and painting techniques and texture.
The above pictures are actual photos of Vincent Van Gogh's work-I show several of his landscapes to the students and let them pic their favorite to create. I'll let the pics explain and you can refer to the lesson plan on Dick Blick for more details. One tip is that I do encourage them to work on one small section of the picture at a time.
I thought their art turned out amazing!
Subscribe to:
Posts (Atom)


