Saturday, June 11, 2011

Painting Razorbacks


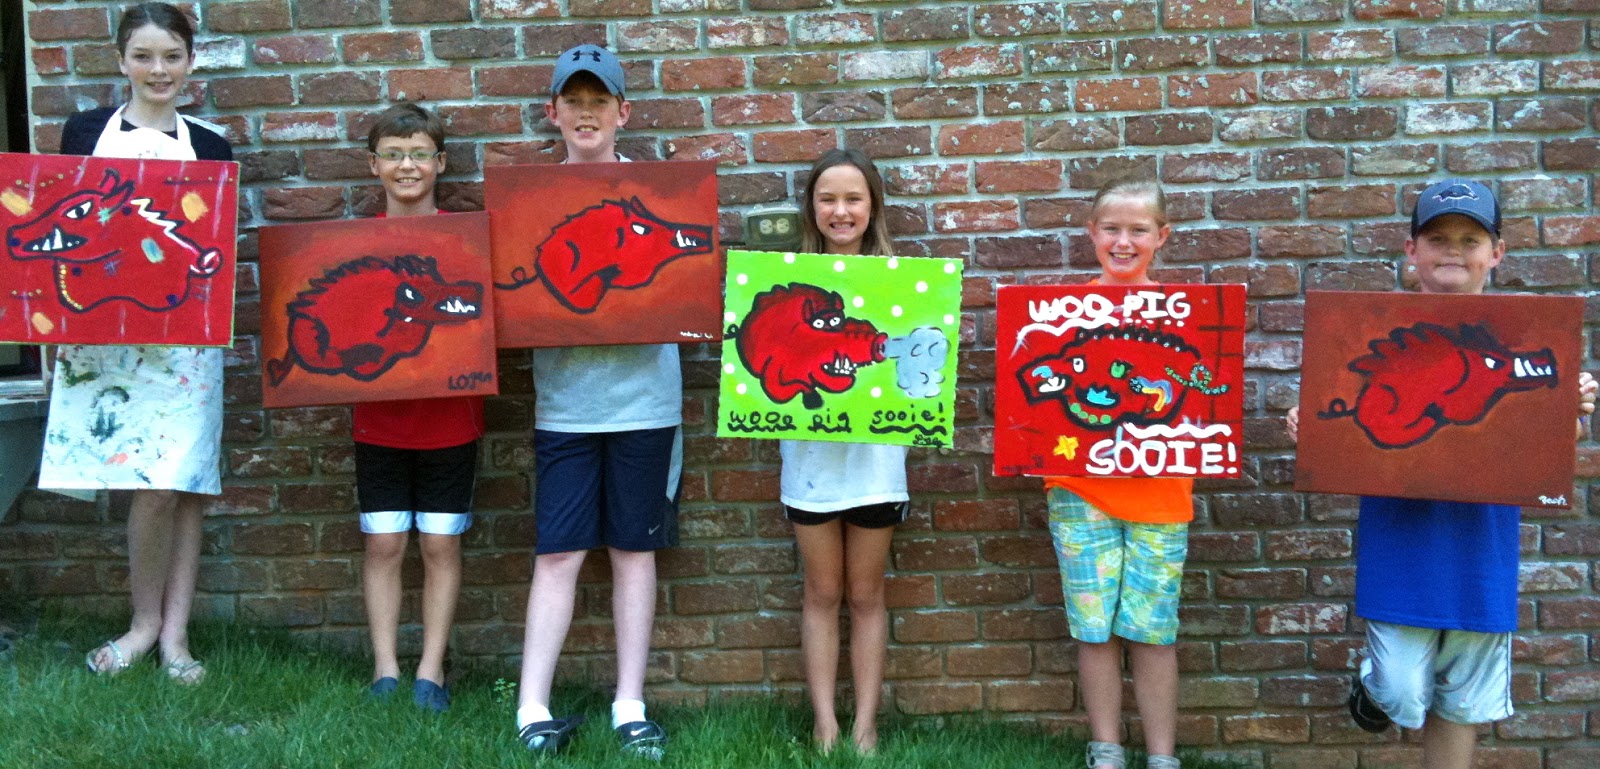
Week two of art painting workshops got me ready for Razorback football! I did two art lessons for painting a Razorback. This lesson posted here is was geared for 4th-6th grade students.  This lesson was just in time to make great Father's Day gifts for Dad Hog fans.


First we looked at several hog pictures, paintings and cartoons from the internet for inspiration. I taught a short drawing lesson on four different "hogs" and showed the students how to break it down into your most basic shapes first. I let students practice their drawings and then select one of the four hogs they drew on their practice paper.


Next I instructed students to paint out their design with a light colored wash, focusing on shapes, not detail.


After students got their basic shapes, I instructed them to go over them with more detail in black.


Painting in the back ground and edges came next.


Now some color for the Hogs.


Since this was an older group, I let them have a little more freedom with their artistic expression-I let them choose their design, style and color schemes.


Students were also encouraged to paint their edges with a decorative design. We did these in acrylic paint on a 16 x 20 canvas. We completed this painting in a 2-1/2 hour workshop.


Monday, June 6, 2011

Painting Flags....


I've started my painting workshops for the summer and so far I've been amazed at the talented artists I've seen! I'm doing three painting classes per week, each one 2-1/2 hours. Students complete a painting in acrylics on a 16 x 20 canvas during the class. I give instruction and provide a demo as we paint together. We also learn about different elements and principles of art, art styles and basic painting techniques. Last week we painted Folk Art Houses, Peacocks and American Flags. This is the first painting lesson I've done on American Flags and I thought they turned out so cute! These paintings were all done by 1st-4th graders.


Starting out looking at a flag and talking about how many stripes and stars. We also talked about different painting styles. Then we sketched out our design with black paint.


Time to add our color.


We talked about proportion and scale to decide how large to make the blue part.


We did have a little drying time before we applied the white. It was so hot outside all we had to do was sit their canvases out in the sun while we took a bathroom break.


The tricky part of the whole painting was lining up the stars correctly.


Some students cut out a star stamp from cardboard and stamped over their dots.


Some decided just to go with the dots for a more impressionistic feel.


God Bless America!


I was inspired to do a few flag paintings myself while preparing for this lesson. Here's what I came up with. I decided to try out several different styles.


8 x 10 Oil on canvas board.


8 x 10 acrylic on canvas board 


8 x 10 oil on stretched canvas


This was my favorite. 8 x 10 oil on canvas board 

Thursday, May 19, 2011

Inspiration for lessons-top 5


So how do I get inspiration for my art lessons?


Here's my top 5 sources (drum roll, please)....

1) Other art lesson blogs, art websites and craft blogs. Since I'm on 5's today, here's 5 of my favorites (of course, there are so many good ones it's hard to narrow it down, so also be sure and check out my regular reads in the left sidebar). I would love to add your link if it's not there! I also love looking at the lesson plans at Dick Blick.

2) Art lesson books. The library has tons of great books I've checked out for lesson inspirations. Occasionally, I run across one with fabulous pictures and projects and I just HAVE to own. Here's a pic of a lesson I adapted from one of my favorites, Dynamic Art Lessons for Children*.


3) Paintings I've tried and work of other artists. Once I figure out how to do something and it "clicks", I love explaining it to others. After painting still life pears, I knew I could simplify it enough to teach kids to paint them too. Also, when I run across fun art created by others, I always think about teaching children how to recreate it in a lesson. For example, I love Tricia Robinson's art and follow her blog Little Redhead. Her Dress Art inspired my Proverbs 31 lesson.

4) The Arkansas Young Arkansas Artists Exhibition I love taking my own kids to this each year and seeing all the amazing art created by children around our state. I always take notes and have gotten some great ideas for lessons.

5) Kids. They come up with great ideas of things they want to learn to draw, paint or create. One of my advanced classes begged me to paint pet portraits (result-dog painting above). My own kids have also come home with wonderful projects from school that I can elaborate on or adapt to a different medium.

I would love to hear from you about where you get your inspiration for your art lessons, or even your own art! Follow me in the upcoming months as I elaborate more on each one of these, and show you more new examples of art lessons I've tried!

*Advertisement disclaimer-I only use advertisements inside my posts and recommend products when it is something that I have actually used and found helpful with my lessons or in my own life/art. I do not do it solely for monetary gain, and all money earned from this site goes to support our sponsor children at Compassion International.

Suzy's Artsy Craftsy Sitcom

Friday, May 6, 2011

Painting Pears


This is one of my favorite painting lessons that I do with kids. I usually do it in my summer workshops. I wish I had more pictures of the process, but I don't. It's a great lesson to introduce shadows and highlights and mixing colors. We paint on a 16 x 20 canvas with acrylic. I instruct students to paint BIG. I also demonstrate how to draw a pear (start out with a bigger circle on bottom and a smaller circle on top, then connect the curves). This painting usually takes 2-3 hours. The results are always adorable and work of art that parents love to hang in their home.


Monday, May 2, 2011

Folk Art Neighborhoods


I loved this lesson that I saw at Lines, Dots and Doodles on Folk Art Neighborhoods. Her lesson was inspired by Karla Gerard-I just loved her artwork! It inspired me try it with my kids for some artwork for our playroom. We used acrylic paint and stretched canvas. Here's the play by play.


The small one on the top right was done by my 6 year old.
The bottom right was painted by my 9 year old. The larger left painting is mine. We had so much fun painting these!

Thursday, April 28, 2011

My First Blog Award!!

Thank you to Hannah at Art. Paper. Scissors. for the Versatile Blogger Award nomination! I couldn't find who started this award, or what it was really for, but none the less, I was honored to received it, and excited about all the new visitors I've had to my blog because of it. Once I started the "awardee process" to nominate others for this award, I felt kind of guilty because it has taken me sooooo long to complete this post--so please don't feel obligated to "pass it on" if you don't have time. I did, however, have a lot of new blogs I've been reading over the past few months so I wanted to regcognize them. Hope you enjoy learning about some great new blogs that I've discovered!

Awardee Steps:
1. Thank the person who gave you the award and link them back to your post.
2. Share seven things about yourself.
3. Pass the award fifteen recently discovered bloggers. (Most of mine are recently discovered, but very well deserving!)
4. Contact these bloggers and let them know they've received their award.

Here's my 7 "Very Random" Facts About Me:
1. I have been married 16 years.
2. I have three children, one cat and two dogs.
3. I love, love, love fresh flowers-especially tulips, peonies and gerber daisies.
4. My life verse from the Bible is Hebrews 12:2
5. I love decorating (on a budget) and looking at decor magazines/blogs.
6. I'm a huge harmonizer and avoid conflict.
7. I'm great at starting new projects constantly, but can never seem to finish them.

15 Bloggers also deserving of the Versatile Blogger Award:


Tuesday, April 26, 2011

Fun with Watercolor


Here's a fun way to mix things up with watercolor paints while having some fun learning color mixing and warm/cool colors. I did this project with 12 kindergarten students and it took approximately 1, 45 minute session, and 1, 20-30 minute session.

Supplies needed:
2 large pieces of white construction paper
Scissors
Watercolor paints (primary colors-I used liquid)
Watercolor brushes
Cray-Pals/Oil pastels
Table salt
1/2 water-1/2 rubbing alcohol mix in spray bottle
School Glue


On one sheet of paper instruct the students to draw an ocean floor landscape with bright oil pastels-coral, seaweed, sand, shells, etc.


On the other sheet of white paper, instruct the students on how to draw an octopus.


Now have fun mixing up some warm colors to paint your octopus. While the paint is still wet, spritz with alcohol mixture. This should produce a spotted effect. After this paper dries, instruct students to cut out their octopus.


Next, let students mix up cool colors. Before painting, wet the landscape background and then apply paint. This will cause colors to run and blend together. Before paint dries, shake on an ample amount of table salt for a really cool effect. After this paper dries, have students glue their octopus to their background.


Hope everyone had a wonderful Easter!

You also might like....