Showing posts with label fall art. Show all posts

Sunday, October 20, 2013

Smart Fab Pillows

Smart Fab Pillows


I was so excited to get three rolls of Smart Fab to try out for some new project ideas. First I watched their demo video and my creative juices started brewing. According to their website, Smart-Fab is the smart alternative to paper and cloth and it's available in a range of brilliant, non-fading colors. This innovative non-woven fabric is easy to cut, fold, glue, sew and staple – and even paint and draw on. Smart-Fab is strong, yet flexible - but doesn’t fray. And, it’s recyclable! Children and educators love working with Smart-Fab. It’s perfect for an unlimited range of indoor and outdoor projects, including bulletin boards, banners, arts & crafts and scenic design.


My middle child is sewing now, so I enlisted her help with my idea. I'm always wanting cute outdoor accent pillows for my screened in porch that I can change out for each season, but don't want to spend the $$, so I decided to give Smart Fab a try for some fall designs.


I used a 12 x 12 canvas as my template for a square and added and extra four inches to the outside. Using chalk, I traced my shape onto the Smart Fab.


I sketched out my design in chalk.


I used acrylic paint for my pumpkin design. I did have to use a couple layers because the Smart Fab really soaked up the paint and dulled the color, especially on the black fabric. I used masking tape to secure the edges to the table so I could paint without it sliding around.


I put the finished fabric outside on a hanger to dry for about 15 minutes.


My daughter stitched the edges, and then I used scissors and easily cut the fringe--and yes, crisp clean edges-no fraying! I stuffed with some cotton filling and now I have a cute fall pillow. This project took me about 1 hour total, including the drying time.


Click on this LINK to see a great video with more creative ideas for using Smart Fab. You can follow Smart Fab on Facebook HERE. I'm looking forward to doing some more ideas with my Smart Fab samples :)


Tuesday, November 20, 2012

Native American Animal Hide Art Project


This week I was asked to help my daughter's second grade class with a Thanksgiving art project (one of my favorite things to do :))

 I can still remember one of my favorite art projects from my elementary school years.  We were learning about the Pioneer days, and we made Indian art on faux animal hides. It must have made an impact since I still remember it some 30+ years later.  My daughter's class just finished up a unit on the Wild West, and Thanksgiving is right around the corner, so I did some research and came up with a lesson for American Indian animal hide art. I found a similar lesson already online at Dick Blick, but here's how we did ours.


I precut 20 grocery bags-the front side of the bag or side without the crease. First, we talked about the different types of Native American Art like cave and rock carvings, basketry, pottery, sand art and clothing. There are tons of websites out there on these art forms and the history of Native American art.

We also learned how Native American's used symbols to represent different things in their drawings. I drew a variety of Native American symbols on the white board, and talked about what some of them represented. Then we learned that instead of paper or canvas,  Indians used tanned animal hides for their art. The hides were also used for maps, prayers and to record stories. I showed a sample of an animal hide shape, reminding them that it didn't have to be perfect. Next, I instructed the kids to draw out their animal hide shape on the backside of the paper (the side with the "Kroger" logo), and then either cut or tear out the shape.


Next was the fun part! I showed the kids how to wad up the paper into a ball, and then flatten back out again, reminding them to use care and not rip the paper. I told them to do this five times (or more) and then they would start to see that the paper would get soft and wrinkled. Then I showed them how to fold it in half and rub the sides together to give the paper a furry feel. They went crazy doing this!


Before we started our designs, we talked about how Native American's used charcoal and minerals to "paint" on their hides, and the colors were usually limited to sienna, ochre, turquoise, black and white. I encouraged the students to use as much color as they wanted, and also to create their own symbols. 

Now time to draw the design with a black marker.


We used Crayola oil pastels to fill in the designs.


Last we mounted the finished "hide" on a piece of black construction paper.


I taught this to 20 second graders, and we completed it right under one hour. Students were engaged the entire time and loved making their designs. This was also a project that the boys seemed to enjoy as much as the girls.

Do you remember your favorite art project as a kid? I would love to hear what you remember!

Happy Thanksgiving Yall!


Sunday, October 30, 2011

More Owls


I did another round of owl workshops this week. Just thought I'd share my student's amazing art!


Saturday, October 8, 2011

Drawing and Painting Pumpkins


Here's a fun fall project where you can introduce numerous concepts like; lines, shading, and warm/cool colors. First, I teach students how I draw a pumpkin. I always teach that before you paint to practice your drawing and plan your painting. And I love talking about painting fruits, and stress that there's not such thing as a "perfect" pumpkin. They can be fat, tall, bumpy, lop-sided, etc. Students painted on a 12 x 12 stretched canvas with acrylic paints.


We added a little green puff paint for the vines and tricked out our edges with stripes. Students were kindergarten through 2nd grade (one fourth grader), and completed their paintings in a 2-hour workshop.


Monday, December 20, 2010

Painting Landscapes


Okay, rewind about six weeks, when the trees were showcasing their blazing orange and yellow leaves. I got the students outdoors and we had a lesson on painting landscapes.


I was pretty impressed with the results-these were done by 3rd graders. I've got some talented little artists! Students painted on canvas with acrylic.


Tuesday, November 17, 2009

Goodbye Fall


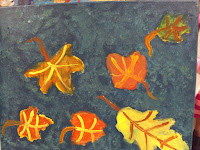
I had a painting workshop Monday and had the sweetest group of little girls. I was a little disappointed though when I woke up to a gloomy sky, rain and a lot of brown leaves left on the trees since we were supposed to be painting "Fall Leaves". Regardless of the circumstances, we used some good photos of leaves and our imaginations to paint some beautiful pictures. These were painted by 5-7 years olds-amazing!

You also might like....