Friday, April 2, 2010


There are a ton of great lessons out there inspired by artist Wayne Thiebaud. This lesson focuses on texture and form.


We used canvas panels, modeling paste and acrylic paints. Starting off was actually like icing a cake. The kids had a blast working with the modeling paste to create their texture.


We used one hour long session to talk about the artist himself, his style of art, and his color palette. We practiced drawing forms and then sketched out our selected pastries and treats. Lastly we spread on our paste to the canvas panels and drew in our design with palette knives. This needs to dry for about 24 hours before it can be painted. The second one hour session was spent painting our treats! For best results, paint a base coat first or use a primer.


Don't they look delicious?


Friday, March 26, 2010

Some perspective for Spring


We've had some beautiful weather off and on the past month-guess that's just like March. It got me in the mood for a flower lesson. I love Van Gogh and I love sunflowers, so I did a lesson on perspective while drawing a sunflower still life. I also incorporated reviewing warm/cool colors. I was inspired at some other artlesson site for teaching to draw different perspectives on the flowers, but I can't find where it was. If it was you, please post a comment and I'd love to direct others to your lesson too.


I hadn't done the aluminum sheets in one of my classes yet, and they were begging to draw on the "foil" so here it is again. I instructed students on how to draw sunflowers from three different perspectives-front, side and partially turned.


For my advanced class we used chalk pastels on black construction paper. Love how the bright colors turned out. Students were instructed to use cool colors in the background and warm colors in the flowers and vase. As you can see, some took the artistic freedom to do it their way...which is always okay!


Friday, March 12, 2010

A weekend of painting


I know, I've been a little behind on my class postings. I'm still trying to organize my pictures and figure out how to get them off my old computer. In the meantime, I thought you might like to see some of the paintings I did over the weekend at the Barry Thomas oil workshop I attended. Click the title or the picture above and it should take you right to my post.

Saturday, February 20, 2010

More Hearts


I got this project idea from Art Projects for Kids.( (click here) for her version). I used the aluminum sheets (instead of foil) and made the lines "embossed". We also used permanent markers. This is a great lesson to teach primary and secondary colors. I used this for my K-3rd home school art class and taught them about lines, shapes and warm and cool colors. We used Jim Dine as our inspiration artist and I introduced Pop Art style.


We also did the fiber art heart lesson in my two advanced classes and the kids loved it (click here for lesson)


Just wanted to show a couple samples of the ones the kids made. They all turned out really cute! I also used this lesson to introduce Jim Dine to them and we talked about mixed media. It ended up taking about 2-1/2 hours total to complete this project.

Wednesday, February 3, 2010

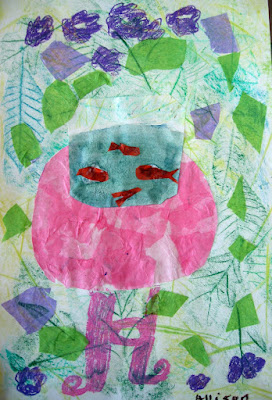
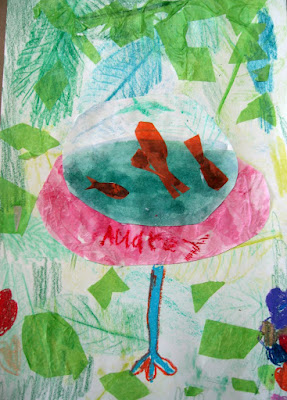
Henri Matisse Collage


I adapted this lesson from the Incredible @rt Department . It's listed under Matisse Goldfish-Mixed Media in the elementary lessons section. It has several steps, but it works well for groups where you have students that work at different speeds because there is always another segment to work on. I start off with everyone doing the fish bowls together. It's a great way to work on some basic drawing skills. After I present the information on Matisse, and we look at several of his gold fish works, we draw out fish bowl lightly in pencil on white construction paper and cut them out. Then the fun part; we experiment with blending watercolors in blues and greens. We use very "watery" paint, and then while it's still wet, we sprinkle table salt on the paint and it gives it a crystallized effect. The students always think this is so "cool". Next we cut out the table top (I always talk about perspective here) and decoupage it with a variation of pink tissue paper. These two items are set aside to dry until the next class session.

For the background, I use a white sheet of construction paper. Sometimes I let the kids go outside and collect their own assortment of leaves, or sometimes I already have an assortment together (depending on time and class dynamics). I peel the wrappers off a large selection of cool colored crayons and let them do leaf rubbings to totally cover the background. I encourage them to overlap colors and leaves. Also the sparkle crayons give this a great extra "punch".


The last segment of this project is putting everything together. The students cut out the gold fish and extra flowers out of tissue. Everything is glued into place and we use oil pastels to draw the table legs and any other accents. This is also a great lesson to talk about the impact of cool and warm colors used in composition. I love how the gold fish "pop" off the page. *When gluing on the fish bowls be sure to use a sponge brush to apply the glue instead of putting it right on the back-this will help to avoid the "glue lines" like in some of these pics.


You also might like....