Saturday, November 26, 2011

Painting Lesson Using Texture


Art Lessons with Texture are one some of my favorite to teach and create. They are always a big hit with the students; they are messy and a new experience for most. Here's a simple art lesson idea that combines texture and color to make great abstract art.


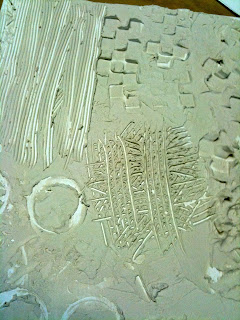
I always use modeling paste, but it can be fairly expensive. Joint compound and paintable caulking will also work as a less expensive option. Spread paste on a board or hardboard canvas like you were icing a cake. I had all sorts of stamps, lids, bubble wrap, etc., available to make designs and imprints into the paste. Divide board into sections, if you want, and do each section a different texture. Let dry completely-usually takes about 48 hours.


This is also a great lesson to introduce the color wheel and discuss some basic color theory.


Have students decide on a color scheme for their painting.


It's hard to tell in this picture, but after the paint dried, we used metallic paint and dry brushed over the top. It really makes the texture "pop". 


This is a great way to make some cool art for your home too. I did a post awhile back on Easy Art to Create For Your Home; it's so easy and inexpensive to make your own art as decor!

Tip Junkie handmade projects

Saturday, November 19, 2011

Painting Santas


Time to get in the Christmas Spirit, right.......

I know, it's not even Thanksgiving yet.


But I take the month of December off from teaching art, and blogging, so I can focus on my own kiddos, and create Christmas Crafts with them, like cookies, gingerbread houses, salt dough ornaments, etc.


Here's some results from my first Santa painting workshop that I've ever done. These kids were kindergarten through 3rd grade. Thought they created some beautiful Santa's! We used my Santa Painting at the top of the post as our inspiration piece.


These were done in acrylics on a 16 x 20 canvas, and were completed in a 2-hour workshop.


Want to paint on of these with your little elves this Christmas? Check out my Tips on Paintings with Kids.

Art and Children's Literature


Some of my favorite books are the "I Know an Old Lady Who Swallowed a..... Pie, Fly, etc..." series. They are so much fun! Here's a fun little enrichment art lesson I did with my daughter's first grade class. And let me just say how much I am amazed by you art teacher's out there who teach more than 7 kids at a time, like I normally do. I taught 19 kids for this lesson and I was worn out! I learned a lot though-always a great experience to teach in a different setting. The kids were great, but 19 asking for help is a little overwhelming when you're used to smaller numbers!


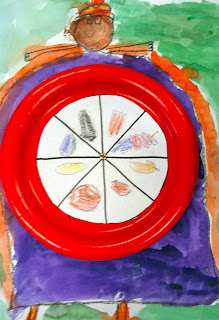
Here's my sample. I drew my foods on separate paper and then we taped them onto the plate as the teacher read the story. There are a lot of enrichment opportunities with this, and I'm sure you academic teachers out there could think of even more, but here's what I came up with. We had a visual for memory of story order; we talked about what kind of story (fiction or non); we talked about traditions in our own homes; and talked about our own favorite Thanksgiving foods and what food groups they were in. We also had fun imagining our own stories as they made themselves with big bellies of food. You could also introduce fractions with the pie plate sections. 


I told the students to draw themselves instead of the old lady. I instructed them to draw in pencil first on a large piece of construction paper. Then they used crayons to go over the pencil lines and filled in with watercolor paints.


We listed their favorite foods on the board and I drew some of them out for them. Then they drew their favorites on their plate and colored them in. The plates are attached with a metal brad so they turn as you tell your own story.


Happy Thanksgiving! Don't eat too much!

Linking up my story art up over at:
http://www.amommysadventures.com/

Tuesday, November 15, 2011

O'Keeffe Inspired Acrylic Paintings


Using Georgia O'Keeffe as our inspiration artist, my homeschool girls painted these beautiful flowers in acrylics on a 12 x 12 canvas. I printed off around 7 different photos from the internet and let them select which one they wanted to paint.  


They started off identifying the basic shapes, starting with the center and working their way out. They completed these in 1-1/2 hours. Beautiful work!


Wednesday, November 9, 2011

Fall Foliage Landscapes


I just love, love, love fall! The colors, the crisp temperatures, the smells....it makes me want to paint! 


I've taught several classes this fall on painting fall foliage. It's a great way to introduce landscapes, foreground, middle ground, background and horizon line. 


I also taught about the lighting and shadows.


These were done in acrylic paint on a 16 x 20 canvas.


For all the classes I planned to set up them outside to paint, but it rained. We had to look out the window and use our imaginations!


Our first step, was to put a wash on our canvas and establish our horizon line. We used a watered down gold acrylic to put a wash over our whole canvas and let it dry. Next with the same gold paint we place our horizon line.


Step two was to draw in (with watered down burnt sienna paint) our foreground trees. I suggested they start with three. 


Next, with the same paint, we sketched in the middle ground trees, making them thinner in width. I suggested they put in two to three mid ground trees.


Then we added the background trees, which were the smallest and sat either directly on the horizon line or right below it. Then we painted our sky with blues and whites.


Next we painted our tree trunks. Using the darkest brown for the front trees and shades lighter for the mid and back ones. We painted our shadows, making sure they were parallel. 


We painted the ground a dingy green and then, as we place our leaves, we also put leave colors over the green. 


Added some highlights and shadows to the tree trunks and put in some branches.


Happy Fall!

You also might like....